Star Light Star Bright – Finished Pillow

It’s been a few weeks since I’ve updated you on my progress on the Star Light Star Bright Quilt-A-Long but I promise that I’ve been working on it behind the scenes since then and now I have a finished project to show you!

But first, I want to show you the progression.  🙂

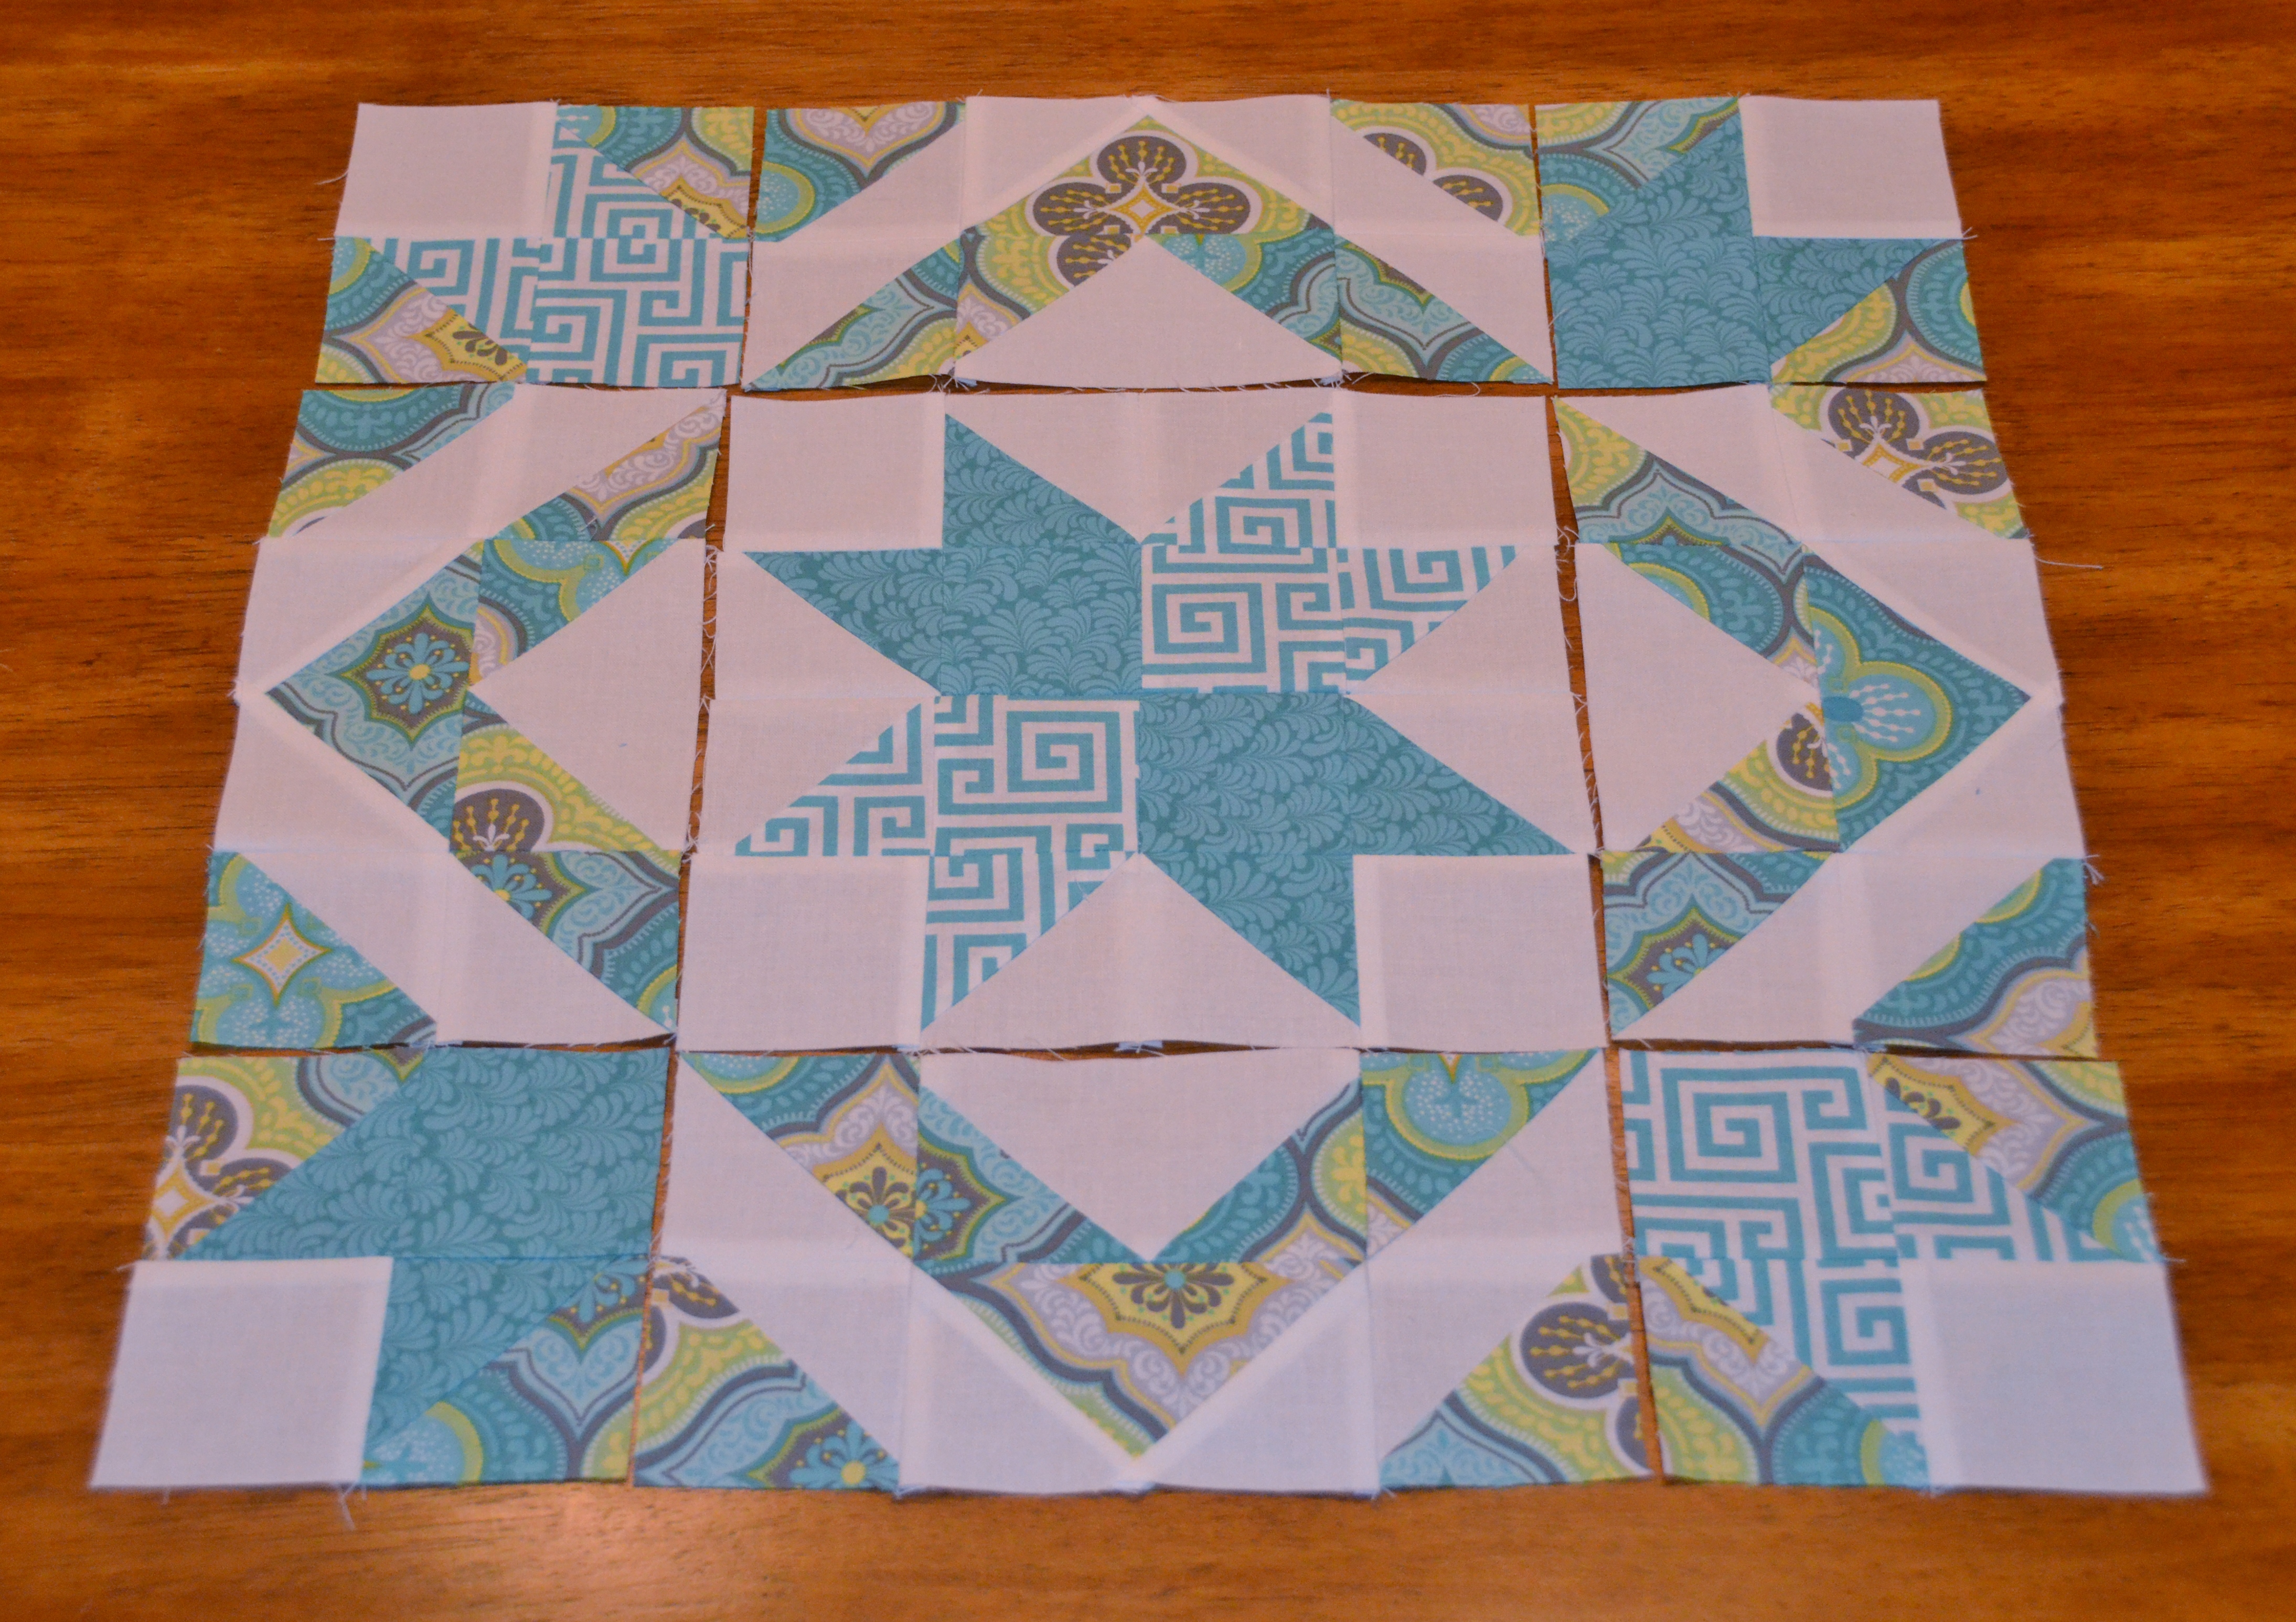
When I last posted, we were preparing for the last section of the block, the corners!  I got mine all sewn together and you can start to really see what the block is going to look like in the end.

DSC_1606  DSC_1607

Now that I had all of the components made, I sewed everything together and I added a small border to the outside.

DSC_1646

Now I was ready to finish up the project!  I decided to use this quilt-a-long to tackle my first pillow.  I used some scraps of batting from other quilting projects and picked up some muslin at Joann Fabrics to use for the backing (since it is just going to end up on the inside of the pillow anyway) and got everything basted and ready to go!

DSC_1648

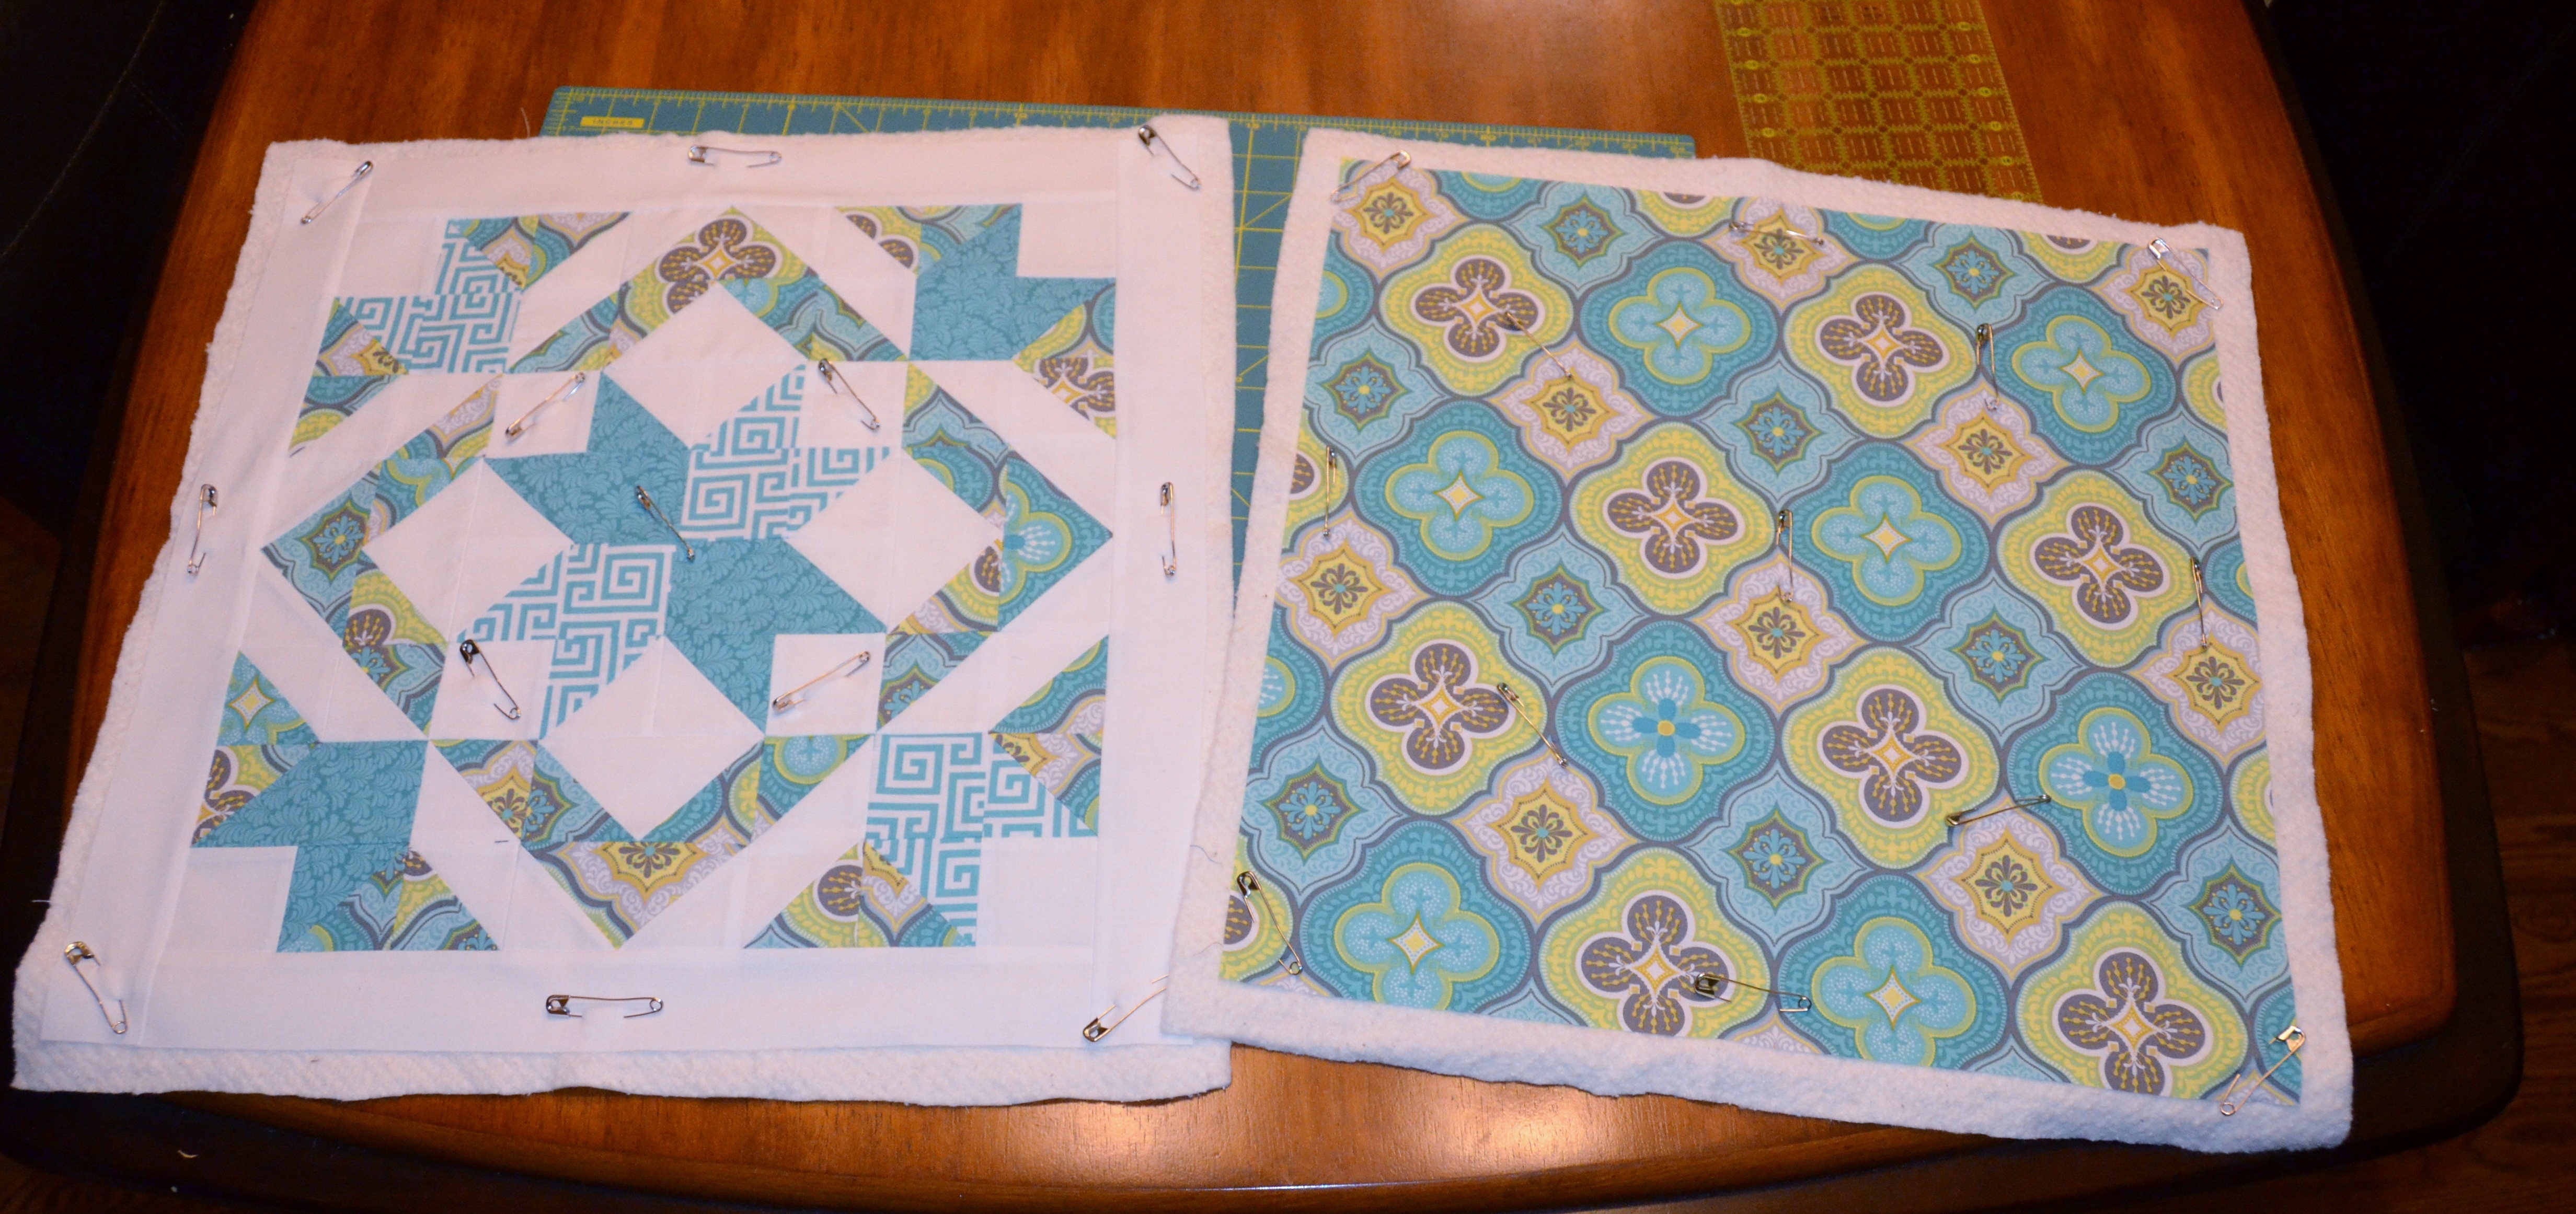
For the back of the pillow, I used a large piece of one of my fabrics from the Star Light Star Bright block.  I loved the fabric but the larger design definitely got chopped up in the piecing for the front so I was really happy to have the chance to highlight it here.  I did dense straight line quilting and I love the texture it creates!

DSC_1655  DSC_1658

I did a lot of echo quilting in the colored areas of my Star Light Start Bright block and left the white background areas plain.  It was really easy to make the echos as I simply followed the edge of my walking foot along the previous line of quilting.

DSC_1650  DSC_1654

Now that I had everything quilted, it was really quick and easy to sew the two halves together and make my pillow!

DSC_1662

The pillow’s final dimensions are 16″ by 16″ and I already had a pillow form ready to go (I saw it on clearance at Joann Fabrics mid-project and decided to go ahead and pick it up).

DSC_1660  DSC_1661

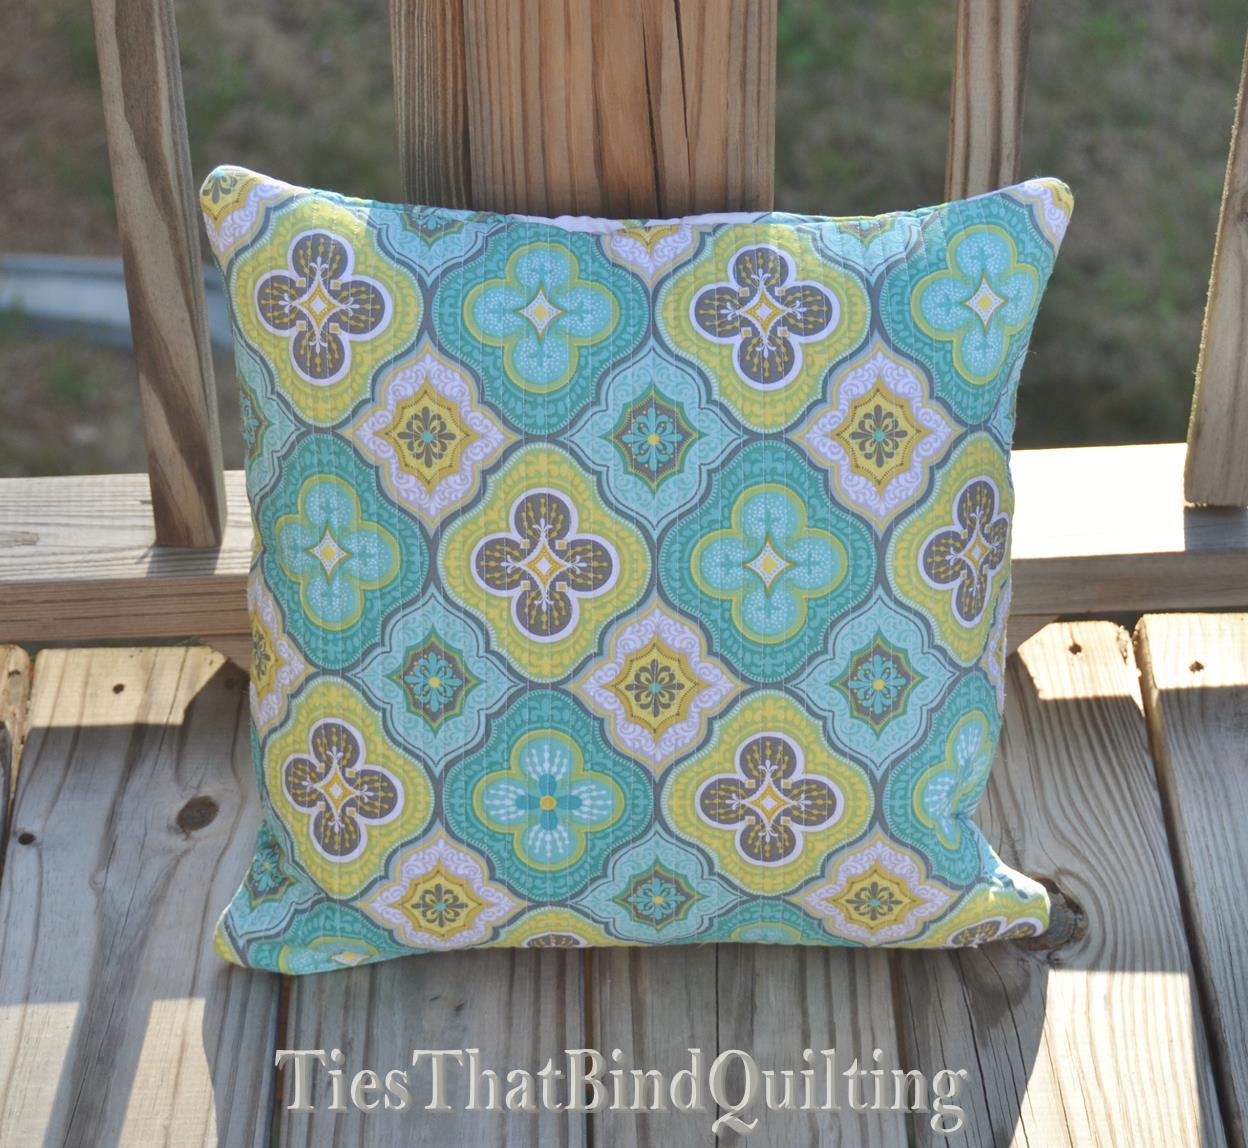
I even successfully installed my first zipper and was honestly happily surprised to find that it really isn’t that difficult to do!

DSC_1663  DSC_1664

Now I have to find the perfect place in my house for my new pillow to live!

DSC_1665

Can’t wait to see how everyone else’s projects turn out!  Our quilt-along host, Melissa, is going to be hosting a parade of finished projects over at Happy Quilting Melissa on April 2 so be sure to check everything out!

Star Light Star Bright Progress

I’ve been successful so far at keeping up with all of the weekly “assignments” for the Star Light Star Bright Quilt-A-Long.

After we had all of our components (squares and HSTs) ready to go, we started piecing different sections of the design.  First up was the block center:

DSC_1578

Next we did the sides of the block.  Since the pattern on the fabric I used here was so large, I had to make sure I was balancing the pieces that were more teal with the pieces that were more yellow/green.

DSC_1586

Now all that is left is the corners and we’ll be ready to start putting everything together.  You can already start to get an idea of what it will look like though.

DSC_1587

The corners are our assignment for this week so we’ll be ready to finish it up soon!

Delightful Stars Quilt-Along

I have one more quilt-along I decided to do this year.  I’m joining in on the Delightful Stars Quilt-Along hosted by Michele Foster who blogs over at the Quilting Gallery.

Delightful Stars Quilt-Along

The quilt is a combination of traditionally pieced and paper pieced star blocks.  I haven’t made any star blocks before nor have I done paper piecing so I thought this quilt would be a good way to expose me to some new things.  There is a new block posted every Tuesday (with a few breaks thrown in so people can catch up if they fall behind).

delightful-stars-white

I chose to do this quilt using only Kona solids but in a variety of colors so there isn’t really a distinct color scheme I’m going for.

DSC_1573I’ve decided that I’m using the following Kona solids in this project:

Ash (for the background), Chartreuse, Tangerine, Oasis, Bluegrass, Crocus Purple, Corn Yellow, Royal, Candy Blue, and Berry

I may add a couple more shades if I feel it is needed as I go along but as you can see, it is definitely a rainbow sort of look.

So far there have been 4 blocks posted and I finished them all up during my snow days last week.  I’m really happy with how they are looking so far!

DSC_1574  DSC_1575

DSC_1576  DSC_1577

One thing I’ve really liked is that Michele posts instructions on how to cut your fabric for making the HSTs and/or flying geese using both traditional methods or using the Easy Start and Geese Ruler.  I bought this ruler at her suggestion and it has been so nice to use!  It minimizes fabric waste, allows you to cut your pieces from strips, and even makes the notched points where needed to make piecing easier and more accurate.  This will definitely be a great tool to have in the future!

Someone else in the quilt-along suggested creating a composite on the coloring sheets as we finish blocks in order to keep track of of how things are looking and the balance of colors around the quilt.

Composite of My Blocks

Everything seems to be going together well so far!

Star Light Star Bright – HSTs

Our assignment for this week in the Star Light Star Bright Quilt-A-Long was to take most of the squares we cut (in my case, it was my 32 3″ squares) and turn them into half-square triangles.

We used them same method for making the HSTs that I learned while making baby quilt I finished for last Christmas so this task went pretty quickly for me.  Soon I had 32 beautiful 2.5″ HSTs!

DSC_1568

Soon we’ll get to start putting everything together and I’m looking forward to seeing how everyone’s turns out.

Star Light Star Bright Quilt-A-Long

I’ve really enjoyed following Melissa at her blog, Happy Quilting Melissa, since I starting my own quilting journey.  She has tons of great tutorials (including the Refracted tutorial I am using for my sister’s quilt) and makes such lovely quilts.

I was so excited when she started discussing a new quilt-along but I also knew I didn’t have enough time to add another quilt to my plate right now.  But the Star Light Star Bright quilt-along looked so fun and I was looking forward to at least following along with everyone.

Lucky for me, Melissa put together yardage and cutting instructions not only for numerous quilt sizes but also for pillows made out of a single large block!  I can find time to join the fun if I only have to make one block.  So here we go!

I choose these fabrics for my pillow.  I’ve been loving teal/aqua lately and wanted to take the opportunity to use a little bit in a project.DSC_1534

Our first “assignment” from Melissa was to get everything cut out.  It was kind of nice that it didn’t take me all that long to cut since I’m just making a single 16″ block.

DSC_1555

And our assignment for this week was to make the flying geese blocks.  I’ve actually never made a flying geese block before so it was a great chance to learn the no waste method for making them that Melissa presented.

Here’s my (small) completed flock of geese!

DSC_1558


I’m having fun with this quilt-along and it is sort of nice to have a project that is a little smaller of a commitment.  Plus – I get to make my first pillow cover!

Two Quilt Tops

Sorry I haven’t posted much lately.  Life has been really busy and I haven’t had much time to spare to sit at my sewing machine and work on my projects.  I feel like I’ve been “go, go, go” between out-of-town weddings (we’re going to another one this weekend too!), work, tennis, and starting to think about Christmas shopping.

But I have put in enough time to have some progress to share on two of my projects.  First off – I have 100% completed my first quilt top!  Last night, I sewed the last seam on the baby quilt top made of 180 HSTs for my cousin’s baby.

DSC_1455

Now I’m ready to try my hand at basting, quilting and binding!

DSC_1456

I’ve also finished the main, center section of the Modern Trees Quilt Along over at Christa Quilts.  I still have borders to add before quilting this project (including my applique string of lights that I haven’t gotten a chance to start yet) but I’m at least starting to see how it is all going to go together and I love how it is looking so far.

DSC_1453

I’m glad that the prints that I chose really do look basically like solids when viewed from a distance.

DSC_1454

I’ve also decided that my back deck works really well for quilt pictures.  I wish the trees had better fall colors though!

Now I need to get a walking foot for my machine so I can start my straight line quilting on the HSTs baby quilt!  Wish me luck!

Blocks for Modern Trees Finished

I had some good time to sew this weekend and I was able to finish the blocks for the Modern Trees Quilt Along over at Christa Quilts.  I’m really happy with how they’ve turned out.  There are a couple edges that aren’t perfect but they should be hidden in the seams once the blocks are sewn together.

I’ve been testing some layouts and here’s the one I’ve liked best so far:

DSC_1432

Now I’m ready for the next step in the tutorial!

Follow my blog with Bloglovin

Cutting Fabric for Modern Trees

After posting about how I was going to make a Modern Trees quilt by joining Christa’s Christmas Quilt Along over at Christa Quilts yesterday, I was excited to jump into cutting up the fabric I’d bought.

I know Christa was planning to make her Modern Trees quilt with solids but I really want to use some prints.  Maybe it is that I’m still new to quilting but I just love the fun patterns and designs you can find in prints.  So I decided to compromise and went with relatively small patterned prints that appear at least mostly solid.  And I did go with solid brown for the trunks!

DSC_1422

I also went ahead and bought all of my fabric for the backing, binding, and the border around my X-mas lights.  (Jo-Ann Fabric was having a good sale!)  I’m using the red and green plaid as backing, the red stripes for the border, and the red and green stripes for binding.

DSC_1426

I’m using Kona Snow for the background and bought some solid fat quarters for making my string of X-mas light border.

DSC_1427

Following Christa’s guide, I started cutting out my triangles for my trees.  As I only had 6 colors, I had to choose three of them to get 3 triangles and three of them for just 2 triangles to get my total of 15.  I tried to balance this with one dark fabric, one medium fabric, and one light fabric falling into each group.

DSC_1429

I also cut my white strips for both the tree background tops and for the strip piecing of the trunks (although I didn’t get to cutting my brown trunk fabric yet).

DSC_1430

While I think everything is looking good so far, I’m definitely going to have to allow more time than the quilt along recommends.  Christa had indicated that what I did last night took her about 45 minutes and let’s suffice it to say that it took me a little longer.  We’ll blame it on trying to catch up on my DVRed TV shows at the same time.  I was distracted!

Have you ever made a quilt with just solids?  Or are you too drawn to prints to totally give them up?

Joining Christa’s Christmas Quilt Along!

So I can’t decide if I’m a glutton for punishment or if I’m simply crazy but I’ve decided to join Christa’s Christmas Quilt Along over at Christa Quilts and make a Modern Trees quilt.  For those of you keeping count at home, that brings me up to 3 quilts that I’m working on at the same time (all while learning what I’m doing as I go).  Yeah – I think I’m crazy!

But you see, after seeing how fun the Modern Trees quilt looked, I simply couldn’t resist!  Check it out:

Modern TreesI love all of the different colors!  And if I’m being totally honest, I love that Christa will be basically walking me through it step by step.

But then, being me, I had to go make life a little more complicated.  The finished quilt top for the quilt along is 30″ by 40″.  But I wanted it to be bigger so that I could actually snuggle up beneath it.  So I’ve decided to add a 10″ wide border on all sides to make my finished quilt 50″ by 60″.

I’d seen this quilt awhile back made by Penny at Quilt2sr5:


I loved the Christmas light border and knew I’d have to do that at some point.  This seems like the perfect way to make my Modern Trees quilt big enough to snuggle with!

The border design actually originally came from The Christmas Trees pattern in the “A Slice of Christmas” eBook by Piece O’ Cake designs.

Penny from Quilt2sr5 did the same thing I’m planning to do – put the Christmas lights border around a different Christmas themed center.

So doing a little copying and pasting to attempt to combine the images of the quilt along quilt with my desired border, I’ve made a (slightly imperfect) mock-up of the quilt design I’ll be making:

X-mas Quilt Mock-up

Christa posted the first step in the process this morning so hopefully I can get started with my Modern Trees Christmas quilt in the next day or so!

Have you ever done a quilt along?  If so, did you have any problems keeping up with the quilting schedule?